「补课」进行时:设计模式(6)——原型模式

1. 前文汇总
2. 找工作
这一天,郭靖大侠因为在桃花岛调戏侍女被黄蓉打出了桃花岛,这下可玩大了,从桃花岛被赶出来吃啥喝啥啊,得赶紧找份工作,西北风可喝不饱肚子哇~~~
这不,我们的郭大侠就开始写简历,准备向丐帮、全真教、白驼山和段氏家族投一份简历,看看能不能先混碗饭吃,等老婆的气消了再回去。
首先,先定义一个简历类:
public class Resume {
    private String name;
    private String position;
    private int salary;

    // 省略 get/set

    @Override
    public String toString() {
        return "Resume{" +
                "name='" + name + '\'' +
                ", position='" + position + '\'' +
                ", salary=" + salary +
                '}';
    }
}
然后,我们的郭大侠开始了熬夜写简历的生活:
public class Test {
    public static void main(String[] args) {
        Resume resume1 = new Resume();
        resume1.setName("小郭");
        resume1.setPosition("一代大侠");
        resume1.setSalary(1000);
        System.out.println(resume1);

        Resume resume2 = new Resume();
        resume2.setName("小郭");
        resume2.setPosition("一代大侠");
        resume2.setSalary(1200);
        System.out.println(resume2);

        Resume resume3 = new Resume();
        resume3.setName("小郭");
        resume3.setPosition("一代大侠");
        resume3.setSalary(1500);
        System.out.println(resume3);

        // ...
}
简历这么一份一份的写太累了,工作都没找到可能先饿死了,不行,小郭同学需要提高写简历的效率,于是,他去找了一个打印机回来:
public class Test {
    public static void main(String[] args) {
        // 效率倍增,直接循环开始写简历
        for (int i = 0; i < 5; i++) {
            Resume resume4 = new Resume();
            int salary = (int)(1000 + Math.random() * (2000 - 1000 + 1));
            resume4.setName("小郭");
            resume4.setPosition("一代大侠");
            resume4.setSalary(salary);
            System.out.println(resume4.toString());
        }
    }
}
这个时候,感觉效率好像还是有点低,每次只能一张一张打印,浪费时间,于是乎,我们的郭大侠又去搞了一个复印机回来。
可是使用复印机需要我们原本的简历支持这个功能,听过这个功能需要扩展 Cloneable 接口:
public class ResumeClone implements Cloneable {
    private String name;
    private String position;
    private int salary;
    // 省略 get/set
    @Override
    protected ResumeClone clone(){
        ResumeClone resumeClone = null;
        try{
            resumeClone = (ResumeClone) super.clone();
        }catch (CloneNotSupportedException e){
            e.printStackTrace();
        }
        return resumeClone;
    }

    @Override
    public String toString() {
        return "ResumeClone{" +
                "name='" + name + '\'' +
                ", position='" + position + '\'' +
                ", salary=" + salary +
                '}';
    }
}
然后我们的复印机就能跑起来了:
public class TestClone {
    public static void main(String[] args) {
        int num = 5;
        ResumeClone resumeClone = new ResumeClone();
        while (num > 0){
            ResumeClone resume1 = resumeClone.clone();
            int salary = (int)(1000 + Math.random() * (2000 - 1000 + 1));
            resume1.setName("小郭");
            resume1.setPosition("一代大侠");
            resume1.setSalary(salary);
            System.out.println(resume1.toString());
            num --;
        }
    }
}
这里实际上我们只有第一个对象是使用打印机打印出来的,后面的对象都是通过复印机直接复印出来的。
这其实就是设计模式中的原型模式。
3. 原型模式
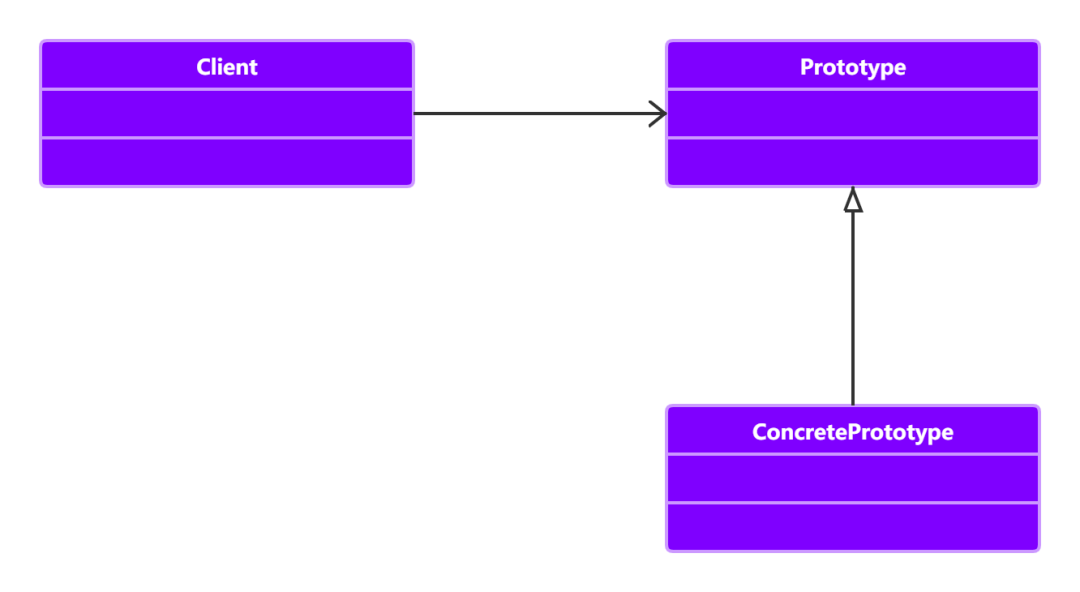
原型模式(Prototype Pattern)的简单程度仅次于单例模式和迭代器模式。正是由于简单,使用的场景才非常地多,其定义如下:
Specify the kinds of objects to create using a prototypical instance,andcreate new objects by copying this prototype.(用原型实例指定创建对象的种类,并且通过拷贝这些原型创建新的对象。)

这个绝对是最简单的设计模式,整个模式的核心就只有一个 clone 方法,通过该方法进行对象的拷贝, Java 提供了一个 Cloneable 接口来标示这个对象是可拷贝的,为什么说是「标示」呢?翻开 JDK 的帮助看看 Cloneable 是一个方法都没有的,这个接口只是一个标记作用,在 JVM 中具有这个标记的对象才有可能被拷贝。那怎么才能从「有可能被拷贝」转换为「可以被拷贝」呢?方法是覆盖 clone() 方法。
通用代码:
public class PrototypeClass implements Cloneable{
    @Override
    protected PrototypeClass clone() {
        PrototypeClass prototypeClass = null;
        try {
            prototypeClass = (PrototypeClass) super.clone();
        } catch (CloneNotSupportedException e) {
            e.printStackTrace();
        }
        return prototypeClass;
    }
}
优点:
性能优良
原型模式是在内存二进制流的拷贝,要比直接 new 一个对象性能好很多,特别是要在一个循环体内产生大量的对象时,原型模式可以更好地体现其优点。
逃避构造函数的约束
这既是它的优点也是缺点,直接在内存中拷贝,构造函数是不会执行的。优点就是减少了约束,缺点也是减少了约束。
4. 构造函数
先看一个简单的有关构造函数的示例:
public class ConstructorDemo implements Cloneable {
    public ConstructorDemo() {
        System.out.println("我被执行了。。。");
    }

    @Override
    protected ConstructorDemo clone(){
        ConstructorDemo demo = null;
        try {
            demo = (ConstructorDemo) super.clone();
        }catch (CloneNotSupportedException e){
            e.printStackTrace();
        }
        return demo;
    }
}

public class ConstructorTest {
    public static void main(String[] args) {
        ConstructorDemo demo = new ConstructorDemo();
        ConstructorDemo demo1 = demo.clone();
    }
}
执行结果如下:
我被执行了。。。
就输出一次,这里可以证明对象拷贝的时候构造函数是不会执行的,原因在于拷贝是直接在堆中进行,这其实也可以理解, new 的时候, JVM 要走一趟类加载流程,这个流程非常麻烦,在类加载流程中会调用构造函数,最后生成的对象会放到堆中,而拷贝就是直接拷贝堆中的现成的二进制对象,然后重新一个分配内存块。
5. 浅拷贝和深拷贝
先看一个浅拷贝的案例:
public class ShallowCopy implements Cloneable {
    private ArrayList array = new ArrayList<> ();
    @Override
    public ShallowCopy clone() {
        ShallowCopy copy = null;
        try {
            copy = (ShallowCopy) super.clone();
        } catch (CloneNotSupportedException e) {
            e.printStackTrace();
        }
        return copy;
    }

    public void setValue(String value) {
        this.array.add(value);
    }

    public ArrayList getValue() {
        return this.array;
    }
}

public class ShallowCopyTest {
    public static void main(String[] args) {
        ShallowCopy copy = new ShallowCopy();
        copy.setValue("123");
        ShallowCopy copy1 = copy.clone();
        copy1.setValue("456");
        System.out.println(copy.getValue());
    }
}
执行的结果是:
[123, 456]
这种情况就是浅拷贝, Java 只拷贝你指定的对象,至于你指定的对象里面的别的对象,它不拷贝,还是把引用给你,共享变量,这是一种非常不安全的方式,需要特别注意。
内部的数组和引用对象不会拷贝,其他的原始基本类型和 String 类型会被拷贝。
那么这种情况如何进行一个深拷贝呢?只需要修改一下刚才 clone 的方法:
// 深拷贝
@Override
public ShallowCopy clone() {
    ShallowCopy copy = null;
    try {
        copy = (ShallowCopy) super.clone();
        this.array = (ArrayList) this.array.clone();
    } catch (CloneNotSupportedException e) {
        e.printStackTrace();
    }
    return copy;
}
还是刚才的测试类,这次的运行结果是:
[123]

