
Android实现弧形View或者ImageView功能
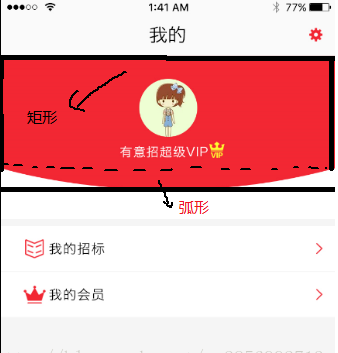
在Android项目开发中,经常会遇到下面这两种弧形布局设计:

图一上方是一个外凸的红色弧形背景,图二上方是一个内凹的背景图片
实现方案:
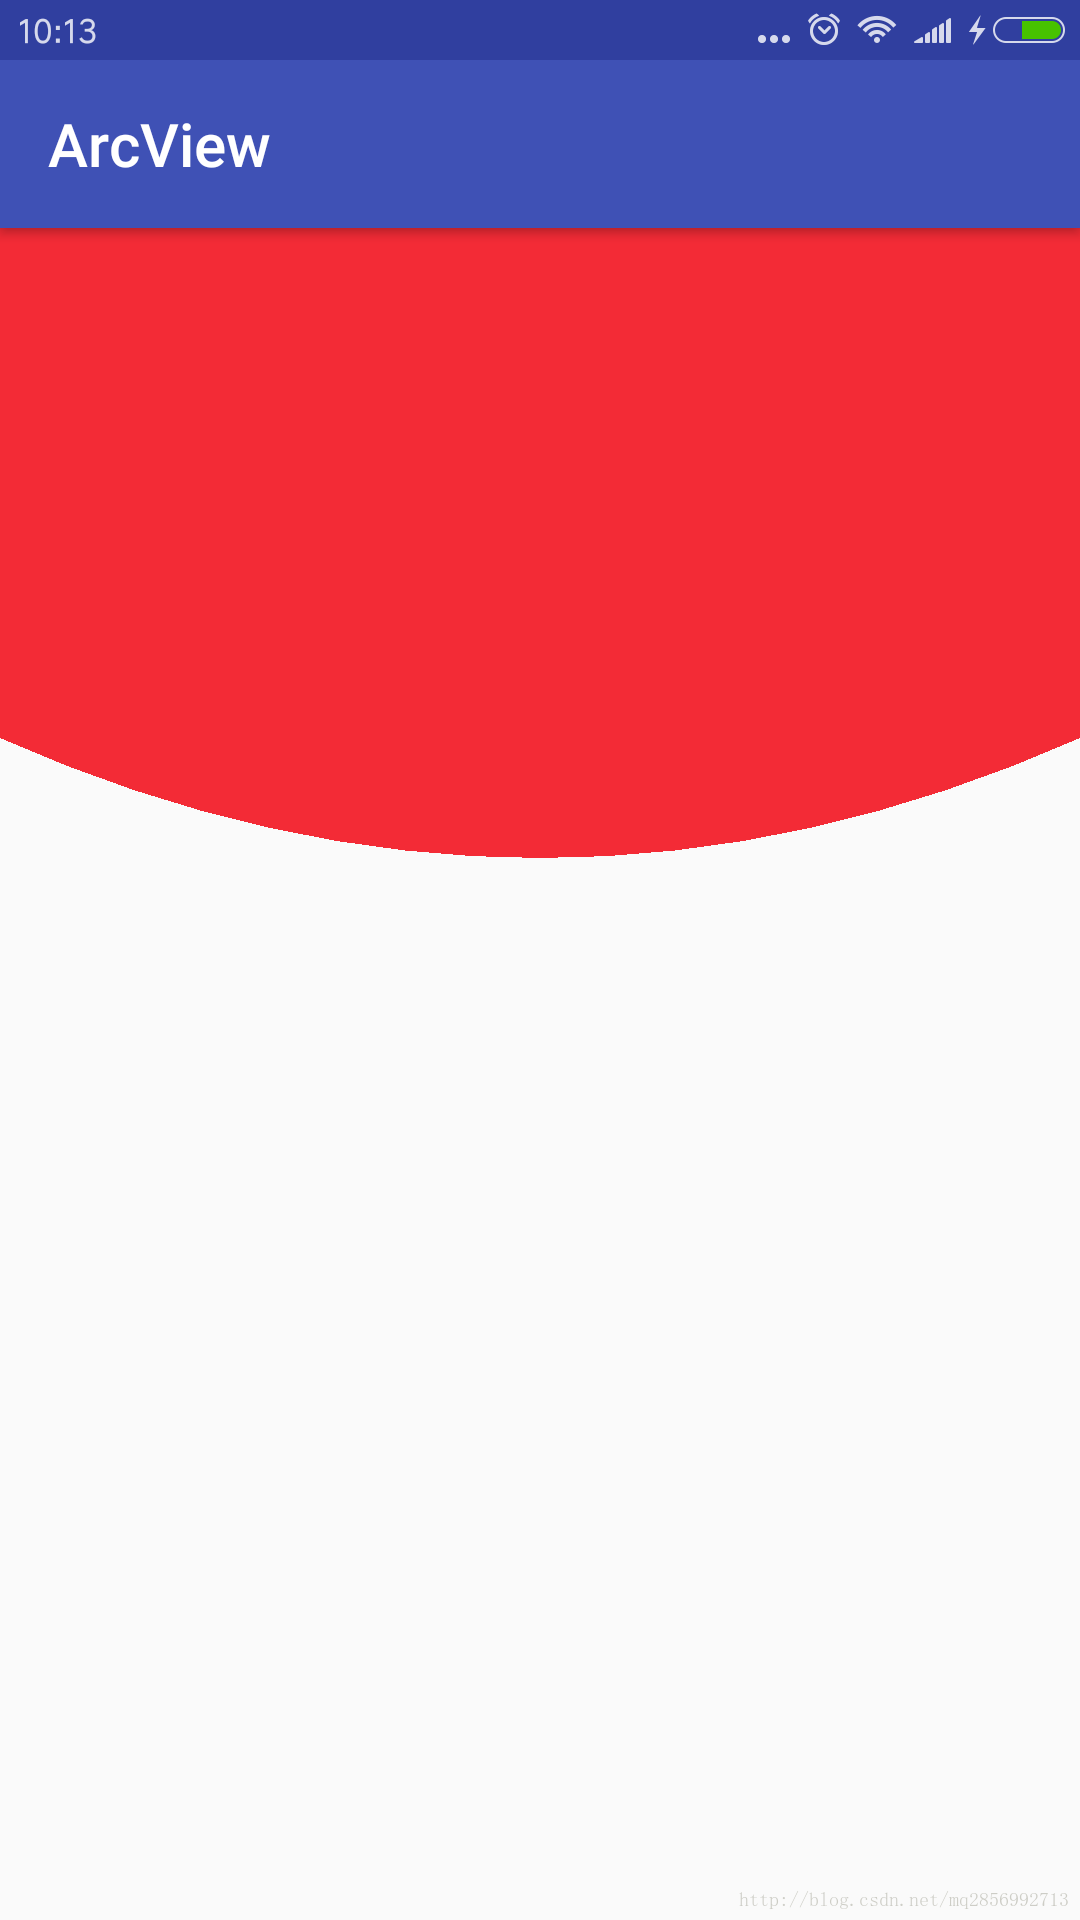
图一可以通过自定义View,绘制出这个弧形View;
图二可以继承自ImageView,并通过clipPth的方式,让ImageView在弧形区域内绘制实现。
图一弧形View具体实现:
图一弧形背景可以分解成两部分,矩形部分+弧形部分
矩形部分绘制很简单,下面弧形部分可以通过二阶贝塞尔曲线来绘制
绘制部分代码如下:
@Overrideprotected void onDraw(Canvas canvas) {super.onDraw(canvas);mPaint.setStyle(Paint.Style.FILL);mPaint.setColor(mBgColor);//矩形部分Rect rect = new Rect(0, 0, mWidth, mHeight - mArcHeight);canvas.drawRect(rect, mPaint);//弧形部分Path path = new Path();path.moveTo(0, mHeight - mArcHeight);path.quadTo(mWidth / 2, mHeight, mWidth, mHeight - mArcHeight);canvas.drawPath(path, mPaint);}
ArcView完整代码:
public class ArcView extends View {private int mWidth;private int mHeight;/*** 弧形高度*/private int mArcHeight;/*** 背景颜色*/private int mBgColor;private Paint mPaint;private Context mContext;public ArcView(Context context) {this(context, null);}public ArcView(Context context, @Nullable AttributeSet attrs) {this(context, attrs, 0);}public ArcView(Context context, @Nullable AttributeSet attrs, int defStyleAttr) {super(context, attrs, defStyleAttr);TypedArray typedArray = context.obtainStyledAttributes(attrs, R.styleable.ArcView);mArcHeight = typedArray.getDimensionPixelSize(R.styleable.ArcView_arcHeight, 0);mBgColor=typedArray.getColor(R.styleable.ArcView_bgColor,Color.parseColor("#303F9F"));typedArray.recycle();mContext = context;mPaint = new Paint();}protected void onDraw(Canvas canvas) {super.onDraw(canvas);mPaint.setStyle(Paint.Style.FILL);mPaint.setColor(mBgColor);Rect rect = new Rect(0, 0, mWidth, mHeight - mArcHeight);canvas.drawRect(rect, mPaint);Path path = new Path();path.moveTo(0, mHeight - mArcHeight);path.quadTo(mWidth / 2, mHeight, mWidth, mHeight - mArcHeight);canvas.drawPath(path, mPaint);}protected void onMeasure(int widthMeasureSpec, int heightMeasureSpec) {super.onMeasure(widthMeasureSpec, heightMeasureSpec);int widthSize = MeasureSpec.getSize(widthMeasureSpec);int widthMode = MeasureSpec.getMode(widthMeasureSpec);int heightSize = MeasureSpec.getSize(heightMeasureSpec);int heightMode = MeasureSpec.getMode(heightMeasureSpec);if (widthMode == MeasureSpec.EXACTLY) {mWidth = widthSize;}if (heightMode == MeasureSpec.EXACTLY) {mHeight = heightSize;}setMeasuredDimension(mWidth, mHeight);}}
使用:
android:layout_width="match_parent"android:layout_height="250dp"app:arcHeight="80dp"app:bgColor="@color/colorRed"/>
实现效果:
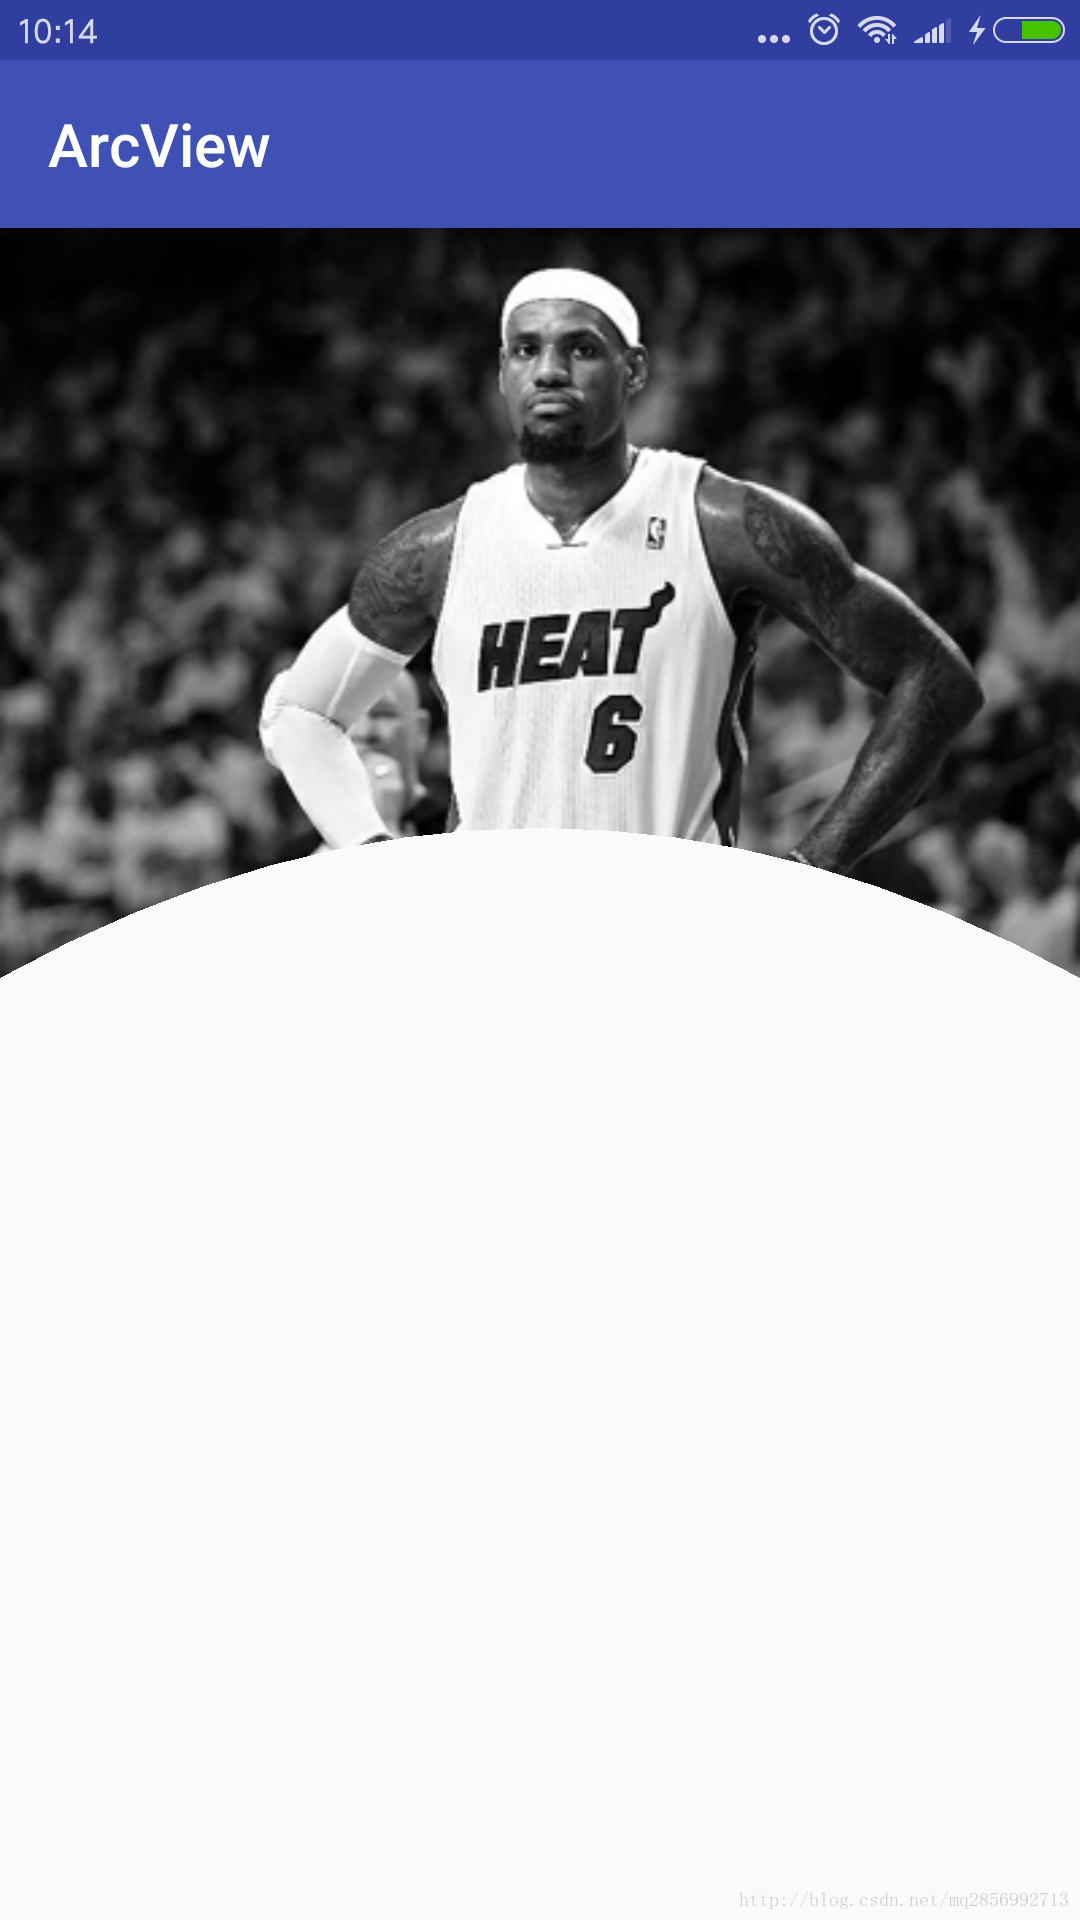
图二弧形ImageView实现:
图二弧形ImageView实现原理其实和图一弧形View是一样的,只不过是
继承ImageView,然后裁剪出一个矩形+弧形区域绘制范围,使得ImageView的绘制范围变成这个带弧形的区域即可。
只要重写ImageView的onDraw方法,在super.onDraw方法之前通过clipPath裁剪出矩形+弧形绘制区域
protected void onDraw(Canvas canvas) {Path path = new Path();path.moveTo(0, 0);path.lineTo(0, getHeight());path.quadTo(getWidth() / 2, getHeight() - 2 * mArcHeight, getWidth(), getHeight());path.lineTo(getWidth(), 0);path.close();canvas.clipPath(path);super.onDraw(canvas);}
ArcImageView完整代码如下:
public class ArcImageView extends ImageView {/**弧形高度*/private int mArcHeight;private static final String TAG = "ArcImageView";public ArcImageView(Context context) {this(context, null);}public ArcImageView(Context context, @Nullable AttributeSet attrs) {this(context, attrs, 0);}public ArcImageView(Context context, @Nullable AttributeSet attrs, int defStyleAttr) {super(context, attrs, defStyleAttr);TypedArray typedArray = context.obtainStyledAttributes(attrs, R.styleable.ArcImageView);mArcHeight = typedArray.getDimensionPixelSize(R.styleable.ArcImageView_arcHeight, 0);typedArray.recycle();}protected void onDraw(Canvas canvas) {Path path = new Path();path.moveTo(0, 0);path.lineTo(0, getHeight());path.quadTo(getWidth() / 2, getHeight() - 2 * mArcHeight, getWidth(), getHeight());path.lineTo(getWidth(), 0);path.close();canvas.clipPath(path);super.onDraw(canvas);}}
使用:
<com.arcview.ArcImageViewandroid:layout_width="match_parent"android:layout_height="250dp"app:arcHeight="50dp"android:scaleType="centerCrop"android:src="@drawable/test"/>
实现效果:
最后附上ArcView和ArcImageView的自定义属性定义部分,attrs.xml文件
<resources><attr name="arcHeight" format="dimension"/><declare-styleable name="ArcView"><attr name="arcHeight"/><attr name="bgColor" format="color"/>declare-styleable><declare-styleable name="ArcImageView"><attr name="arcHeight"/>declare-styleable>resources>
以上就是这两种弧形布局实现方式。
评论